本文将通过几个方面来介绍插入式注解。包括如何搭建项目环境,如何编写注解处理器,以及编写 idea 插件使注解生成的代码不会报错。
示例代码地址
什么是插入式注解
JSR-269 插件化注解处理(Pluggable Annotation Processing API)
可以在编译期期间对代码进行处理,像经常用的 lombok 也是基于这个原理,通过注解生成 getter/setter 等方法。
javac 会通过 SPI 机制,找到要调用的注解处理器,处理完源代码后再去生成字节码。
搭建项目环境
在编写注解处理器时,需要通过修改语法树来达成修改代码的效果,java 提供了对应的方法,但限制了访问,得自己引入。
在 jdk8 中,可以通过引入 java安装路径/lib/tools.jar 来实现,而在 jdk8 以上的版本,已经不提供这个 tools.jar 了。那么在 jdk8 以上如何实现效果?就得自定义编译选项了,可以修改 maven 中编译插件的配置来达成目的。
1
2
3
4
5
6
7
8
| <compilerArgs>
<arg>--add-exports=jdk.compiler/com.sun.tools.javac.tree=ALL-UNNAMED</arg>
<arg>--add-exports=jdk.compiler/com.sun.tools.javac.util=ALL-UNNAMED</arg>
<arg>--add-exports=jdk.compiler/com.sun.tools.javac.code=ALL-UNNAMED</arg>
<arg>--add-exports=jdk.compiler/com.sun.tools.javac.model=ALL-UNNAMED</arg>
<arg>--add-exports=jdk.compiler/com.sun.tools.javac.processing=ALL-UNNAMED</arg>
<arg>--add-exports=jdk.compiler/com.sun.tools.javac.api=ALL-UNNAMED</arg>
</compilerArgs>
|
--add-exports 和 --add-opens (lombok 用的是这个)有细微差别,我测试了下,使用 --add-opens 会编译报错,因为我不想纠结这个事情,于是便不求甚解了。
除此之外,还得配置一个参数:-proc:none 。这个是控制 javac 编译时的行为,-proc:none 指不使用注释处理器,只编译源文件。
maven 插件完整代码如下:
 1
 2
 3
 4
 5
 6
 7
 8
 9
10
11
12
13
14
15
16
17
18
| <plugin>
<groupId>org.apache.maven.plugins</groupId>
<artifactId>maven-compiler-plugin</artifactId>
<version>3.8.1</version>
<configuration>
<source>${maven.compiler.source}</source>
<target>${maven.compiler.target}</target>
<compilerArgs>
<arg>-proc:none</arg>
<arg>--add-exports=jdk.compiler/com.sun.tools.javac.tree=ALL-UNNAMED</arg>
<arg>--add-exports=jdk.compiler/com.sun.tools.javac.util=ALL-UNNAMED</arg>
<arg>--add-exports=jdk.compiler/com.sun.tools.javac.code=ALL-UNNAMED</arg>
<arg>--add-exports=jdk.compiler/com.sun.tools.javac.model=ALL-UNNAMED</arg>
<arg>--add-exports=jdk.compiler/com.sun.tools.javac.processing=ALL-UNNAMED</arg>
<arg>--add-exports=jdk.compiler/com.sun.tools.javac.api=ALL-UNNAMED</arg>
</compilerArgs>
</configuration>
</plugin>
|
这里在顺手放一段 lombok 的配置:lombok/docker/maven/files/jdk-21/classpath/pom.xml
而至于 jdk8 ,事情就简单多了,直接把 tool.jar 引入就完事了。完整代码如下:
 1
 2
 3
 4
 5
 6
 7
 8
 9
10
11
12
13
14
15
16
17
18
19
20
21
22
| ...
<dependency>
<groupId>com.sun</groupId>
<artifactId>tools</artifactId>
<version>1.8</version>
<scope>system</scope>
<systemPath>${java.home}/../lib/tools.jar</systemPath>
</dependency>
...
<plugin>
<groupId>org.apache.maven.plugins</groupId>
<artifactId>maven-compiler-plugin</artifactId>
<version>3.8.1</version>
<configuration>
<source>${maven.compiler.source}</source>
<target>${maven.compiler.target}</target>
<compilerArgs>
<arg>-proc:none</arg>
</compilerArgs>
</configuration>
</plugin>
...
|
注解处理器编写
接下来进行代码的编写,既然是插入式注解,首先我们需要定义一个注解:
 1
 2
 3
 4
 5
 6
 7
 8
 9
10
11
| package com.w2tbp.samples.annotation;
import java.lang.annotation.ElementType;
import java.lang.annotation.Retention;
import java.lang.annotation.RetentionPolicy;
import java.lang.annotation.Target;
@Target({ElementType.TYPE})
@Retention(RetentionPolicy.SOURCE)
public @interface MyLog {
}
|
然后编写注解处理器,得继承 AbstractProcessor 类,并重写 process 方法。在其中我们就能够调用 java 修改语法树的一系列 api,对代码进行一顿输出。
上一节费劲心思配置编译选项,把 tools.jar 引入,就是为了在编写注解处理器的时候调用这些 api。但关于修改语法树,也就是关于 JCTree 的一些语法,怎么使用,我就不多说了,因为我也不太了解 pwq,只是拿来用。
我写的这个注解处理器,是为了让代码生成一段这样的代码:
private final static Logger logger = LogManager.getLogger(Test.class);
完整代码如下:
 1
 2
 3
 4
 5
 6
 7
 8
 9
10
11
12
13
14
15
16
17
18
19
20
21
22
23
24
25
26
27
28
29
30
31
32
33
34
35
36
37
38
39
40
41
42
43
44
45
46
47
48
49
50
51
52
53
54
55
56
57
58
59
60
61
62
63
64
65
66
67
68
69
70
71
72
73
74
75
76
77
78
79
80
81
82
83
84
85
86
87
| package com.w2tbp.samples.annotation;
import com.sun.tools.javac.api.JavacTrees;
import com.sun.tools.javac.code.Flags;
import com.sun.tools.javac.processing.JavacProcessingEnvironment;
import com.sun.tools.javac.tree.JCTree;
import com.sun.tools.javac.tree.TreeMaker;
import com.sun.tools.javac.tree.TreeTranslator;
import com.sun.tools.javac.util.*;
import org.apache.logging.log4j.LogManager;
import org.apache.logging.log4j.Logger;
import javax.annotation.processing.*;
import javax.lang.model.SourceVersion;
import javax.lang.model.element.Element;
import javax.lang.model.element.TypeElement;
import java.util.Set;
@SupportedAnnotationTypes("com.w2tbp.samples.annotation.MyLog")
public class MyLogProcessor extends AbstractProcessor {
private JavacTrees javacTrees;
private TreeMaker treeMaker;
private Names names;
private static final Class<MyLog> ANNOTATION_TO_PROCESS = MyLog.class;
private static final String LOG_CLASS_TYPE_NAME = Logger.class.getName();
private static final String LOG_FACTORY_CLASS_TYPE_NAME = LogManager.class.getName();
@Override
public synchronized void init(ProcessingEnvironment processingEnv) {
super.init(processingEnv);
this.javacTrees = JavacTrees.instance(processingEnv);
Context context = ((JavacProcessingEnvironment) processingEnv).getContext();
this.treeMaker = TreeMaker.instance(context);
this.names = Names.instance(context);
}
@Override
public SourceVersion getSupportedSourceVersion() {
return SourceVersion.latest();
}
@Override
public boolean process(Set<? extends TypeElement> annotations, RoundEnvironment roundEnv) {
JCTree.JCExpression varTypeName = strToJCExpression(LOG_CLASS_TYPE_NAME);
JCTree.JCExpression varFactoryName = strToJCExpression(LOG_FACTORY_CLASS_TYPE_NAME);
Name varName = names.fromString("log");
Set<? extends Element> elements = roundEnv.getElementsAnnotatedWith(ANNOTATION_TO_PROCESS);
for (Element element : elements) {
String className = element.getSimpleName().toString()+".class";
JCTree tree = javacTrees.getTree(element);
tree.accept(new TreeTranslator() {
@Override
public void visitClassDef(JCTree.JCClassDecl jcClassDecl) {
JCTree.JCVariableDecl variableDecl = treeMaker.VarDef(
treeMaker.Modifiers(Flags.PRIVATE + Flags.STATIC + Flags.FINAL),
varName, varTypeName,
treeMaker.Apply(
List.nil(),
treeMaker.Select(
varFactoryName,
names.fromString("getLogger")
),
List.of(strToJCExpression(className))
)
);
jcClassDecl.defs = jcClassDecl.defs.prepend(variableDecl);
super.visitClassDef(jcClassDecl);
}
});
}
return true;
}
private JCTree.JCExpression strToJCExpression(String components) {
String[] componentArray = components.split("\\.");
JCTree.JCExpression expr = treeMaker.Ident(names.fromString(componentArray[0]));
for (int i = 1; i < componentArray.length; i++) {
expr = treeMaker.Select(expr, names.fromString(componentArray[i]));
}
return expr;
}
}
|
这样基本的事情就完事了,还剩下一件事,就是这个插入式注解得通过 SPI 的方式被编译器调用,所以需要配置一下。
具体是在 src/main/resources/META-INF/services 目录下新建一个 javax.annotation.processing.Processor 文件
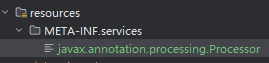
内容为注解处理器的路径:
1
| com.w2tbp.samples.annotation.MyLogProcessor
|
除了这种方式,还可以用谷歌的 auto-service 依赖,然后在注解处理器上直接用注解 @AutoService 就行了。
注解处理就告一段落了,完整代码地址在:samples/pluggable-annotation
测试
接下来测试一下。
新建一个项目,引入上面项目的依赖,简单写个测试类,编译后发现,我们想要的结果已经出现了:
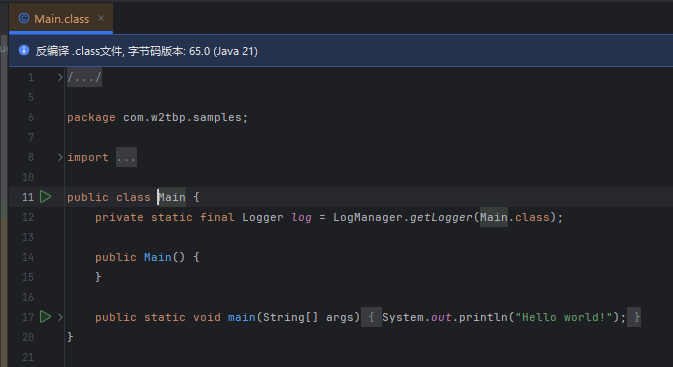
测试项目代码地址在:samples/pluggable-annotation-test
idea 插件
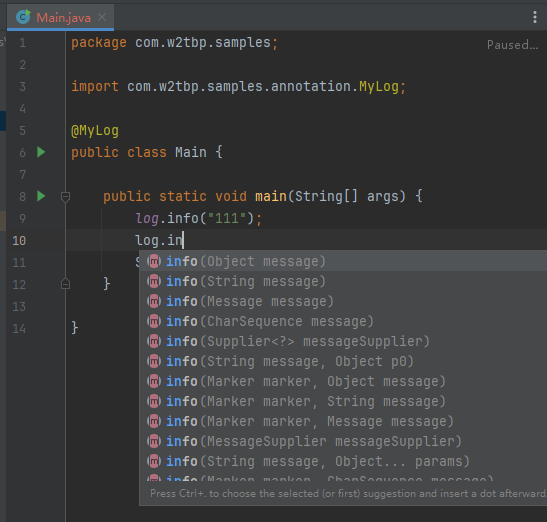
现在我们知道可以生成语句,那么在代码中就可以用这个生成的对象了。但我们敲下 log 对象时,却出现了问题:
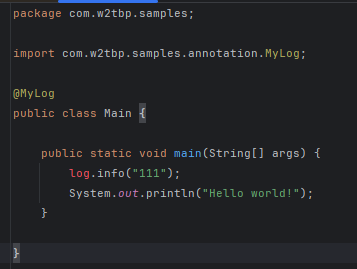
这个对象飘红了,这是正常的,因为现在并没有这个对象。但是在用 lombok 的时候显然没有这个问题,这是为什么呢?因为 lombok 在 idea 中用了插件,一些较旧的 idea 版本会让人自己装,但现在都集成了。
于是我们也来开发个自己的插件,当我们安装插件后,会看到和 lombok 一样的效果,log 也不报错了,也有代码提示了:
关于如何写插件,新建工程,怎么配置,如何实现,说起来也有点冗杂。代码基本上就是从 lombok 插件中 copy 的,ps:看它的那个插件源代码真是一件痛苦的事情。
插件的代码地址在:samples/pluggable-annotation-idea-plugin
可以直接下载项目目录下的 pluggable-annotation-idea-plugin-1.0-SNAPSHOT.zip ,然后在 idea 插件选项中,选择从磁盘中安装,安装此插件。
另需注意,IDEA 会有版本兼容问题,我这里使用的 IDEA 版本为 2024.1
其他
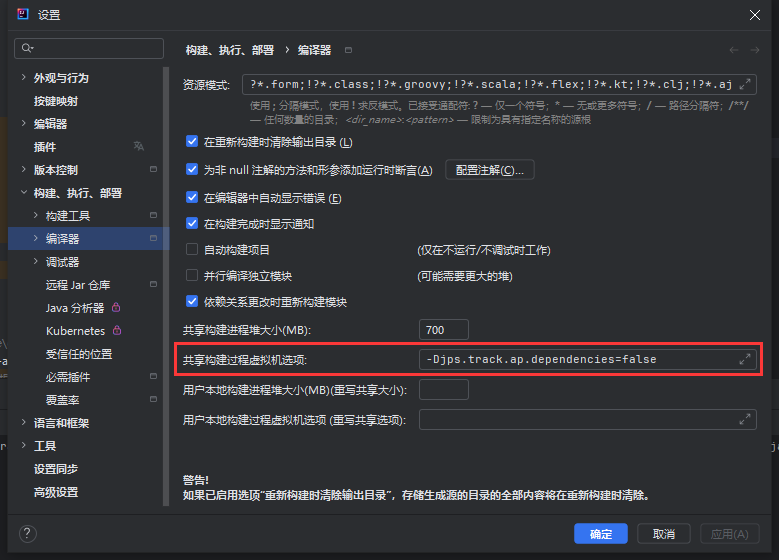
报错 java: java.lang.IllegalArgumentException
路径:Build, Execution, Deployment -> complier -> Shared build process VM options
加上该配置 -Djps.track.ap.dependencies=false